
Fasteners for 3D Printing - Using Heat-Set Threaded Inserts
Never again let the broken threads of your 3D printed parts ruin your day. Use heat-set threaded inserts when fastening parts together.
Fasteners are used every day for assemblies and components that need to be joined together. When fasteners are used in traditional manufacturing, bolts are often tapped straight into the metal substrates. 3D printed parts are unique from a material and robustness standpoint, therefore threaded holes can wear easily if the fasteners are taken on and off multiple times. Heat-set threaded inserts are your method for succes for these types of assemblies.
What is a heat-set threaded insert and how does it work?
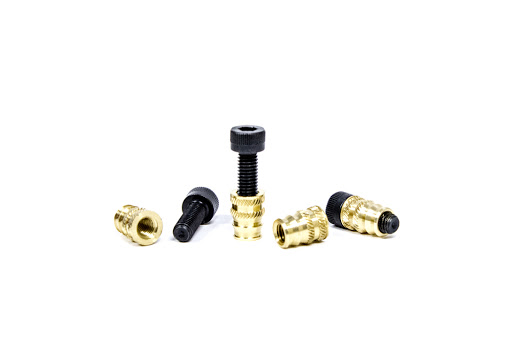
A heat-set threaded insert has two important features. The inside of the brass piece of hardware has a nice, threaded thru hole. The exterior has knurls and ridges, so when installed using heat, the plastic can easily flow around and then solidify. Once solidified, the insert is in place, making it resist torque and pull-out.
Heat Set Inserts
Why threaded inserts over tapped holes?
The brass threads of inserts have a much higher strength when compared to a bare plastic tapped thread. The inserts make a great bond with plastic parts when heat is applied, so you won't have to worry about motor misalignment if you are securing it to a 3D printed part or a belt tensioner wearing down.
Strength aside, the inserts will last longer for any assembly where bolts and screws need to be cycled more than once. Tapped plastic can wear and become cross threaded easily, whereas brass inserts can handle consistent cycling much better.
Where can I find them?
Most hardware stores carry threaded inserts, but life is always easier when ordering from McMaster-Carr.com. Here is a direct link.
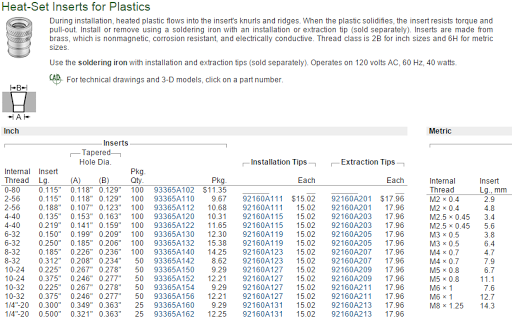
Heat-Set Inserts -McMasterCarr
Tools you need:
- Heat-set threaded inserts
- Printed plastic part
- Soldering iron
Preparing the threaded insert:
Use the soldering iron on a low setting to preheat the threaded insert using a shallow tapered soldering iron tip.
Install:
When the threaded insert is up to temperature (should only take a few seconds) apply the insert to the appropriate hold. Apply a very little amount of pressure and the insert will melt the plastic in the hole and allow the insert to be set in place. The plastic will flow around the knurls of the insert. Be sure to align the insert squarely and flush to the plastic surface. Remove the soldering iron when it is in place.
Assemble:
After a few moments the threaded insert will be ‘set’ within the plastic. The threaded insert is ready to receive the screw’s threads and the parts can be assembled.
Happy Printing.